About
Features
Example
Interface
Line Art
Pattern Size
FAQs
Connected Pattern Maker
FAQs
What platform does the Connected Pattern Maker support?
The Connected Pattern Maker works with all versions of Windows.What is the difference between vector graphics and bitmap graphics?
Connected Pattern Maker Version 2.9, which is recommended for Windows 7 and Vista, installs the pattern files into the folder:
c:\Users\Public\Patterns
Version 2.8, which is recommended for use with Windows XP, installs the pattern files into the folder:
c:\Program Files (x86)\Connected Lines\Pattern Maker\Patterns
If you are using the Connected Pattern Maker 2.8 or earlier with Windows 7 or Windows Vista then you will need to change both the directory for storing temporary files and the directory for saved pattern files.
To change the Temporary Directory and the Pattern Directory:Now repeat the same process to set the directory in which pattern files are saved.
- Start the Pattern Maker.
- From the Options menu, select Display Setup. The Display Options window opens.
- Select the Temporary Directory tab. You should see that the Temporary Directory is set to the Pattern Maker folder on the C drive.
- Double-click the C:\ folder.
- Double-click the folder labeled Users.
- Double-click the name of the user running the Pattern Maker.
- Double-click Documents.
- Select the Pattern Directory tab. You should see that the Pattern Directory is set to the Patterns folder on the C drive.
- Double-click the C:\ folder.
- Double-click the folder labeled Users.
- Double-click the name of the user running the Pattern Maker.
- Double-click Documents.
- Click OK to save your changes.
The Connected Pattern Maker is a vector graphics drawing application. Vector graphics is one of the methods for creating and storing pictures in computers; the other is bitmapped graphics.Once lines are drawn, can I change their thickness?
- Vector graphics compose an image, in this case a pattern, as a series of points, lines, arcs, and objects (circles, rectangles, and squares). Lines and objects are drawn based on starting and ending points, and contain color and line thickness attributes. The lines, curves, and objects are distinct within the pattern and can be edited, resized, moved, removed, and shaped without diminishing the quality of the image.
- Bitmapped graphics compose an image of a series of small dots called pixels or picture elements. Pixels are arranged on a grid, which delineate the shape and color of the image. Once created, the picture elements become part of the image and the number of pixels is fixed. Changing the size of a bitmap diminishes the quality of the image. The graphics file formats that you can load in the Connected Pattern Maker, .bmp, .gif, and .jpg, are bitmapped graphics.
You can change the thickness of pattern lines at any time. There are three different areas in which you may want to change the line thickness: lines viewed in the application, printed lines, and lines of a pattern saved as a bitmap.What size can I print a pattern?
To change the thickness of the pattern lines as viewed in the application:To change the thickness of printed pattern lines:
- Click the Display button and select the Pen Size tab.
- Move the selection bar left or right to increase or decrease the width of the monitor pen size. The number in brackets [n] is a reference value in pixels of the thickness point along the selection bar.
- Click OK.
To change the line thickness before you create and save a bitmap image of a pattern:
- Click the Size button and select the Pen Settings tab.
- Enter the desired pattern line thickness. You can enter the thickness as a fractional value or a decimal value.
- Click the Size button and select the Bitmap Image tab.
- In the Bitmap Pen Size section, increase or decrease the line thickness by moving the selection bar left or right to increase or decrease the width of the monitor pen size. The number in brackets [n] is a reference value in pixels of the thickness point along the selection bar.
- Click OK.
You can print the same pattern to any size from as small as a thumbnail to as large as a wall. Patterns larger than a single page print on multiple pages, which may be taped or pasted together. Cut lines are printed on each page to allow for easy assembling of pages at the margin.If I save a pattern as a bitmap (.bmp), can I load it back into the Pattern Maker to modify or edit?
You can set the following print options: Duplicate copies of the same pattern on a single page, a single page of a multi-page pattern, cut lines, a mirror image of your pattern.
Bitmap (.bmp) files may not be edited by the Pattern Maker. However, you can open and modify .bmp files in third party graphic drawing program. If you are saving BMP files using the Create Bitmap Image feature, you should also save your patterns in Connected Lines' .pat format.
Why are the lines of the pattern incomplete when I change the bitmap size with my third party graphics editor?
When saving a pattern as a bitmap, the size of the bitmap image determines the quality of the resulting image. Bitmap images are best converted and used at the size at which they were created. Since the number of pixels in a bitmap is fixed, enlarging a bitmap increases the size of the pixels stretching the same number of pixels over a larger area. When you resize a bitmap, the image has a coarse jaggedy appearance.Can I print a pattern larger than 8.5x11?
Before you convert a pattern to a bitmap image, you must set the Bitmap Image size and the Bitmap Pen Size to the intended final size and line thickness. Select the Size button and the Bitmap Image tab.
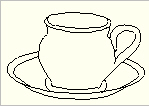
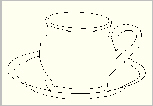
The example below shows two patterns saved as Bitmap images: the first saved to 150 by 104 pixels and the second saved to 450 x 313 pixels and then reduced 67%. The second Bitmap Image is missing line segments as a result of being reduced in size with a third-party graphics editor.
150 x 104 pixels 450 x 313 pixels
Reduced 67%
There is no limitation on the size of a printed pattern. Patterns larger than a single sheet of paper print on multiple pages, which can be taped or pasted together.Can I use the Connected Pattern Maker to help make stage sets and murals?
With the ability to print patterns as large as a wall, the Connected Pattern Maker is a favorite for creating murals and theater stage sets. If you participate in a theater group in your community, university or college, high school, or elementary school, introduce your set designers to the Connected Pattern Maker. The Connected Pattern Maker makes life-size realistic patterns that may be painted directly over or transferred onto cloth or wood surfaces to create amazing backgrounds and props.Why is a pattern not printing to the desired size?
The white background determines the size of a pattern. A pattern surrounded by a wide border of white background will print smaller than a page. When preparing an image, tightly crop it to the intended use of the pattern. Once a pattern is created, use the Change Picture and the Align Pattern features to load a recropped picture and align the existing pattern to it.Why do white boxes appear while drawing?
The Connected Pattern Maker is a real-time interactive drawing program. The graphics accelerators of some video cards are too slow to keep up with the real-time drawing at high resolutions. Running the Connected Pattern Maker in 256 color and 800x600 screen resolution works well with most video cards. When switching video modes, reboot your computer before running the Connected Pattern Maker.How can I transfer a paper pattern to wood?
There are a number of methods to transfer a pattern to wood:
- The simplest method is to lightly glue the paper pattern using a spray adhesive or rubber cement to the wood. Cut the pattern, remove the paper and sand the wood.
- Create a template of the pattern using cardboard or thin 1/8" plywood. Use the template to outline the pattern on wood with a pencil. This method works well when transferring the same pattern multiple times.
- Use a hot iron or a wood burning tool. Print the pattern using the Print Mirror Image option. Tape the paper pattern printed side down. Using the hot iron or hot wood burning tool, heat the back side of the pattern lines. The pattern will transfer from the paper to the wood.
- Use a sewing-type cutting wheel. Tape the paper pattern to the wood. Using the cutting wheel, follow the outline of the pattern on wood. Remove the paper pattern. The cutting wheel will leave an indentation of the pattern outline on the wood.